The definite guide to your high-performance IPFS Gateway


The definite guide to your high-performance IPFS Gateway
So you want to store and fetch your public IPFS Assets with no compromise of speed and reliability while participating in strengthening the network? You are at the right place! We compiled the essential bits so you can get this done quickly.
What’s IPFS? The Interplanetary File System is exactly what the name says, a distributed file system to replace the centralized HTTP Web that we know.
This is how Stacktical’s IPFS server is used to our own platform’s Dapp (15s faster add operations for a lightweight JSON payload vs Infura’s).
We limited the domain that accesses our node with CORS and used an Nginx encrypted proxy to handle HTTPS connections to IPFS.
Turnkey solutions like Infura’s IPFS Gateway and Pinata are great to start and to give IPFS a try but everyone should avoid Centralized Services to access decentralized services (which defeat the purpose of Decentralization and don’t provide the performance and reliability you need for your (D)app.
This article will cover:
- The complete setup of a Cloud instance to run our IPFS node
- How to make your node securely available for your (D)app
IPFS Server setup
We are leveraging Google Cloud Platform so this article will cover setup on a compute instance type n1-standard-1 with Debian OS but it’s pretty much straightforward on other Cloud vendors and Linux Oses.
Here we create an instance with HTTP and HTTPS allowed in the firewall section (We will have an HTTP -> HTTPS redirect).
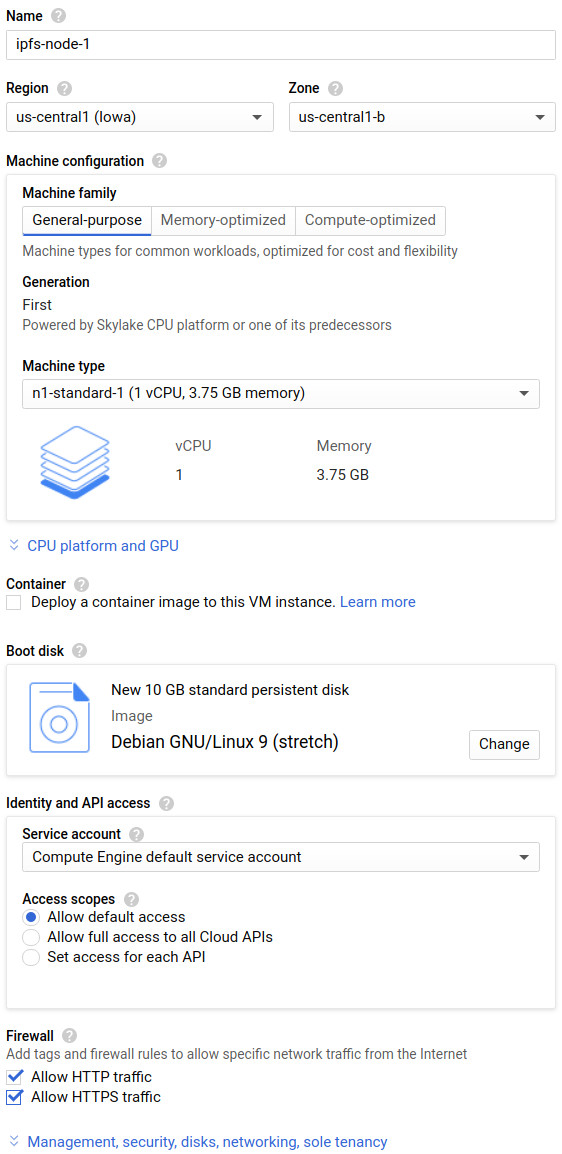
Or with the GCP SDK:
gcloud compute --project=stacktical-0 instances create ipfs-node-1 --zone=us-central1-b --machine-type=n1-standard-1 --image-project=debian-cloud --boot-disk-size=10GB --boot-disk-type=pd-standard --tags=http-server,https-server
Storage layer
Our Node Storage need will most likely grow in size, so it’s better to give our node a dedicated Volume for flexibility and extra persistency:
Add a persistent disk to your IPFS Node instance and mount it.
That’s how our node fstab entry looked like:
UUID=[DISK_UUID] /mnt/disks/[MNT_DIR] ext4 discard,defaults,nofail 0 2
Where:
- [DISK_UUID] is the Disk Unique Id obtained with the
blkidcommand. - [MNT_DIR] is the directory where the ipfs volume will be mounted,
/mnt/disk/ipfs-disk/in our case.
Set the Volume location for IPFS to make use of it:
echo 'export IPFS_PATH=/mnt/disk/ipfs-disk/ipfs' >>~/.bash_profile
source ~/.bash_profile
sudo chown -R  ubuntu:ubuntu $IPFS_PATH/*
mkdir $IPFS_PATH/ipfs
You may change the user of the chown command to yourself of a newly created one for ipfs (here ubuntu as an example).
Install IPFS
This is where the fun begins, the installation of IPFS is quite straightforward.
We use ipfs-update tool to install and update IPFS easily:
cd ~/
wget https://dist.ipfs.io/ipfs-update/v1.5.2/ipfs-update_v1.5.2_linux-amd64.tar.gz
tar xvfz ipfs-update_v1.5.2_linux-amd64.tar.gz
cd ipfs-update
sudo ./install.sh
ipfs-update versions
ipfs-update install latest
Running ipfs-update install latest will automatically install the latest release of IPFS or upgrade a previous installation like this:
$ sudo ipfs-update install v0.4.22
fetching go-ipfs version v0.4.22
binary downloaded, verifying...
success! tests all passed.
stashing old binary
installing new binary to /usr/local/bin/ipfs
checking if repo migration is needed...

Installation complete!
Remember to restart your daemon before continuing
Now we have to initialize IPFS Server with ipfs init --profile server (making sure IPFS_PATH is properly set) to generate the repo and its configuration file.
We will have to edit that configuration file to turn the install into a proper IPFS Server.
You can already check the content of that configuration file in $IPFS_PATH/ipfs/config
IPFS Service setup
We can now automate the IPFS daemon management with Systemd or supervisord
Create the following systemd to persist the lunch of IPFS Server across reboots:
sudo bash -c 'cat >/lib/systemd/system/ipfs.service <<EOL
[Unit]
Description=IPFS Daemon
After=network.target

[Service]
ExecStart=/usr/local/bin/ipfs daemon
User=ubuntu
Restart=always
LimitNOFILE=10240
Environment="IPFS_PATH=/mnt/disks/ipfs-disk/ipfs"

[Install]
WantedBy=multi-user.target
EOL'
We can now enable that service to start upon reboots:
$ sudo systemctl daemon-reload
$ sudo systemctl enable ipfs
$ sudo systemctl start ipfs
IPFS Gateway setup
Configure CORS on IPFS
ipfs config --json API.HTTPHeaders.Access-Control-Allow-Origin '["<your domain or all (*)>"]'
ipfs config --json API.HTTPHeaders.Access-Control-Allow-Methods '["PUT", "GET", "POST"]'
And confirm/edit the content on the API section of the configuration file:
"HTTPHeaders": {
   "Access-Control-Allow-Headers": [
      "X-Requested-With",
      "Access-Control-Expose-Headers",
      "Range"
   ],   "Access-Control-Expose-Headers": [
      "Location",
      "Ipfs-Hash"
   ],   "Access-Control-Allow-Methods": [
      "POST",
      "GET"
   ],   "Access-Control-Allow-Origin": [
      "<your_domain or all (*)>"
   ],   "X-Special-Header": [
      "Access-Control-Expose-Headers: Ipfs-Hash"
   ]
},"RootRedirect": "",
"Writable": true,
"PathPrefixes": [],
"APICommands": []
Note: If you want to accept all domains accessing your endpoint set the Acess Control Allow Origin to *, otherwise specify the domain(s) you want to restrict the access to.
We can now restart the IPFS service to apply the changes:
sudo systemctl restart ipfs
Test
Test connectivity and CORS
curl -v -H "Origin: http://<wrong or right domains>" \
-H "Access-Control-Request-Method: POST" \
-H "Access-Control-Request-Headers: X-Requested-With" \
http://0.0.0.0:5001/api/v0/swarm/peers
You can test the non/working reachability from different domains according to your CORS restrictions
NGINX Proxy Setup
An NGINX installation as a proxy pass will enable us to store data with POST methods to https://<your ipfs domain>/api/v0/add and fetch them with GET method tohttps://<your ipfs domain>/ipfs
First let’s install nginx. on Debian Based distributions:
sudo apt update
sudo apt install -y nginx
sudo systemctl status nginx
Install Certbot
By following the instructions on the Certbot site:
(https://certbot.eff.org/lets-encrypt/ubuntuxenial-nginx.html)[https://certbot.eff.org/lets-encrypt/ubuntuxenial-nginx.html]
This will have our nginx configuration file ready for us to add the final touches. The end result should be a NGINX config file with location sections:
/api/v0/addFor adding files (pinning is on by default)./ipfsTo fetch content on the network./To deny all other traffic.
We can now restart the nginx server:
sudo systemctl restart nginx
Hardening
We strongly recommend enabling unattended upgrades on your server and monitor the size of your IPFS Volume. You may have to grow it in size depending on your usage.
Final notes
Private IPFS Network are an interestging way to answer the scalability of the IPFS network as described by the folks at Pinata.
Stacktical will soon provide a service that will measure the uptime of each IPFS gateways and return the best endpoints to you. Reach out to us if you want to be part of it!
That’s it! We went through tht process of installing a IPFS Gateway to store and deliver content securely on the IPFS Nerwork!
We hope this guide will help other project who are using IPFS. Don’t hesitate to give us a shoot if this article was useful to you at t.me/stacktical
About DSLA Protocol
DSLA Protocol is a risk management framework that enables infrastructure operators and developers to reduce their users exposure to service delays, interruptions and financial losses, using self-executing service level agreements, bonus-malus insurance policies, and crowdfunded liquidity pools.
DSLA Protocol’s flagship use case is to offset the financial losses of Proof-of-Stake delegators and DeFi users, while incentivizing the connectivity, performance and availability of staking pool operators and DeFi service providers.
To learn more about DSLA Protocol, please visit stacktical.com, browse our official blog, and follow @stacktical on Twitter.
Explore more like this

101 NFTs for the DSLA Academy 101
Back to NFT school
## Back to NFT school Dear community, in his latest video update, Wilhem shared [his vision for the DSLA Academy](https://www.youtube.com/watch?v=T7zHJCAhlWA), an interactive experience DSLA learning experience, powered by NFTs. He highlighted a paradigm shift in education, switching from being passive learners to active owners of...